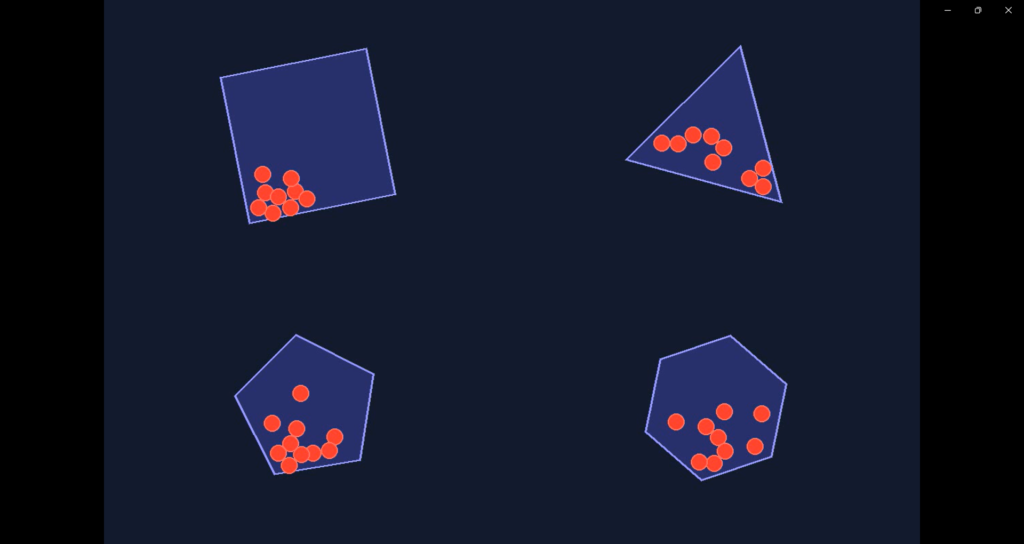
Physics simulations are a fascinating intersection of programming and the natural world, allowing developers to create engaging visual representations of complex physical phenomena. In this tutorial, we will learn how to create a basic physics simulation in Python, focusing on bouncing balls and rotating shapes using libraries like OpenCV, NumPy, and Pillow. By the end of this tutorial, you’ll be able to produce a visually appealing 30-second MP4 video showcasing these simulations.
Introduction
The ability to simulate physical interactions in a virtual environment opens up a myriad of possibilities for developers. From game development to educational tools, physics simulations can enhance user experience and engagement. In this tutorial, we will implement a simple yet captivating simulation where bouncing balls interact with rotating shapes. This hands-on approach will help solidify your understanding of physics concepts and programming principles.
Ball Class Initialization
This snippet defines the `Ball` class, initializing its position, velocity, radius, and mass, which are fundamental properties for simulating physics.
📚 Recommended Python Learning Resources
Level up your Python skills with these hand-picked resources:
100 Professional HTML Email Templates | Color and Font Customizer
100 Professional HTML Email Templates | Color and Font Customizer
Complete Gemini API Guide – 42 Python Scripts, 70+ Page PDF & Cheat Sheet – Digital Download
Complete Gemini API Guide – 42 Python Scripts, 70+ Page PDF & Cheat Sheet – Digital Download
ACT Test (American College Testing) Prep Flashcards Bundle: Vocabulary, Math, Grammar, and Science
ACT Test (American College Testing) Prep Flashcards Bundle: Vocabulary, Math, Grammar, and Science
Leonardo.Ai API Mastery: Python Automation Guide (PDF + Code + HTML
Leonardo.Ai API Mastery: Python Automation Guide (PDF + Code + HTML
class Ball:
    def __init__(self, x, y, radius=12):
        self.x = x
        self.y = y
        self.vx = np.random.uniform(-3, 3)
        self.vy = np.random.uniform(-3, 3)
        self.radius = radius
        self.mass = 1.0
Prerequisites and Setup
Before diving into the implementation, ensure you have the following prerequisites:
Gravity Application
This method applies gravitational forces to the ball’s velocity, demonstrating how external forces can affect motion in a physics simulation.
def apply_gravity(self, gx=0, gy=GRAVITY):
    self.vx += gx
self.vy += gy- Basic knowledge of Python programming.
- Familiarity with object-oriented programming concepts.
- Understanding of basic physics principles, such as gravity and collision detection.
Next, you need to set up your development environment. Make sure you have Python installed, and then install the necessary libraries. You can do this using the following command:
pip install opencv-python numpy pillowOnce you have the required libraries installed, you are ready to start building your physics simulation!
Core Concepts Explanation
Before we jump into the code, let’s discuss some core concepts that underpin our simulation:
Shape Vertex Calculation
This method calculates the vertices of various shapes based on their type and applies rotation, showcasing how to handle geometric transformations in simulations.
def get_vertices(self):
    if self.shape_type == 'square':
        local_vertices = np.array([
            [-self.size/2, -self.size/2],
            [self.size/2, -self.size/2],
            [self.size/2, self.size/2],
            [-self.size/2, self.size/2]
        ], dtype=np.float32)
    # Additional shape types omitted for brevity
    cos_a = np.cos(self.angle)
    sin_a = np.sin(self.angle)
    rotation_matrix = np.array([[cos_a, -sin_a], [sin_a, cos_a]], dtype=np.float32)

    rotated = local_vertices @ rotation_matrix.T
    world_vertices = rotated + np.array([self.center_x, self.center_y], dtype=np.float32)

    return world_vertices
1. Gravity
Gravity is a fundamental force that pulls objects toward one another. In our simulation, we will apply a constant gravitational force to the balls, affecting their velocity over time. This will simulate the natural behavior of bouncing balls under gravity. The apply_gravity method in the Ball class is crucial for this simulation, as it modifies the ball’s velocity based on gravitational acceleration.
2. Damping and Restitution
When a ball bounces off a surface, it doesn’t retain all of its initial kinetic energy. Damping and restitution coefficients are used to simulate energy loss during collisions. Damping reduces the velocity of the ball over time, while restitution determines how bouncy the collision is. These factors add realism to our simulation.
3. Collision Detection
Collision detection is essential for any physics simulation. It determines when two objects interact and how they respond to each other. In our simulation, we will implement a method to handle collisions between the balls and shapes, adjusting their positions and velocities accordingly. The handle_collision method in the Shape class is designed to manage these interactions.
Step-by-Step Implementation Walkthrough
Now that we have a solid understanding of the core concepts, let’s walk through the implementation step by step.
Collision Detection
This snippet handles collision detection and response for the ball, demonstrating the principles of physics interactions and how to adjust positions and velocities upon collision.
def handle_collision(self, ball):
    vertices = self.get_vertices()
    normal, closest_point, dist = self.get_closest_edge_info(ball.x, ball.y)

    SAFETY_MARGIN = 8
    collision_distance = ball.radius + SAFETY_MARGIN

    if dist < collision_distance:
        overlap = collision_distance - dist
        ball.x += normal[0] * (overlap + 3)
        ball.y += normal[1] * (overlap + 3)
        velocity = np.array([ball.vx, ball.vy], dtype=np.float32)
        vel_normal = np.dot(velocity, normal)

        if vel_normal < 0:
            velocity -= (1 + RESTITUTION) * vel_normal * normal
            ball.vx = float(velocity[0])
            ball.vy = float(velocity[1])
Step 1: Setting Up the Environment
Start by creating a new Python file named physics_simulation_004.py. This will be the main script for our simulation. We will begin by importing the necessary libraries and setting up our configuration variables.
Step 2: Creating the Ball Class
Next, we will define the Ball class. This class will encapsulate the properties and behaviors of our balls, including their position, velocity, and gravity application. The initialization method will set up the initial position and random velocities for the balls, as shown in the implementation.
Step 3: Implementing the Shape Class
After the Ball class, we’ll create the Shape class, which will represent the rotating shapes in our simulation. This class will include methods for calculating the shape’s vertices and handling collisions with the balls. The get_vertices method will be particularly important for rendering the shapes correctly.
Step 4: Rendering the Simulation
With our classes defined, we’ll move on to the main loop of the simulation. This loop will update the positions of the balls and shapes, apply gravity, and check for collisions. We will also handle the rendering process using OpenCV to create frames for our video. Each frame will be drawn with the current positions of the balls and shapes, creating a dynamic simulation.
Step 5: Saving the Video
Finally, once the simulation runs for the desired duration, we’ll save the frames as an MP4 video file. This step involves using OpenCV’s VideoWriter functionality, allowing us to compile the frames into a cohesive video output.
Advanced Features or Optimizations
Once you have the basic simulation running, consider exploring advanced features or optimizations to enhance your project:
Point-in-Polygon Test
This function checks if a point is inside a polygon, a crucial operation for collision detection in simulations involving complex shapes.
def point_in_polygon(self, x, y, vertices):
    n = len(vertices)
    inside = False
    p1x, p1y = vertices[0]
    for i in range(1, n + 1):
        p2x, p2y = vertices[i % n]
        if y > min(p1y, p2y):
            if y <= max(p1y, p2y):
                if x <= max(p1x, p2x):
                    if p1y != p2y:
                        xinters = (y - p1y) * (p2x - p1x) / (p2y - p1y) + p1x
                    if p1x == p2x or x <= xinters:
                        inside = not inside
        p1x, p1y = p2x, p2y
return inside- More Complex Shapes: Extend the Shape class to include more geometric forms, such as triangles or polygons, and implement their respective collision logic.
- Multiple Balls: Allow the user to specify the number of balls to simulate, adding complexity and visual interest to the simulation.
- User Interaction: Implement user controls to spawn new balls or shapes dynamically during the simulation.
- Performance Optimization: If you encounter performance issues, consider using NumPy arrays for batch processing of ball positions and velocities.
Practical Applications
The skills and concepts learned in this tutorial can be applied to various domains:
Updating Ball and Shape
This method updates the state of the shape and its associated balls, applying gravity and handling collisions, which is essential for progressing the simulation over time.
def update(self):
    self.angle += self.rotation_speed
    for ball in self.balls:
        ball.apply_gravity()
        ball.update()
        for _ in range(3):
self.handle_collision(ball)- Game Development: Physics engines are crucial for creating realistic interactions in video games. This tutorial provides a foundational understanding to build upon.
- Educational Tools: Create interactive simulations for educational purposes, demonstrating principles of physics in a visually engaging way.
- Animation and Visual Effects: Use physics simulations to generate realistic animations and effects in multimedia projects.
Common Pitfalls and Solutions
As with any programming project, you may encounter challenges along the way. Here are some common pitfalls and their solutions:
- Incorrect Collision Detection: Ensure your collision logic accurately calculates distances and detects intersections. Debugging with print statements can help identify issues.
- Performance Issues: If the simulation becomes sluggish, consider optimizing your code or reducing the number of objects being simulated at once.
- Unexpected Ball Behavior: Adjust your damping and restitution values to achieve the desired bouncing effect. Fine-tuning these parameters can significantly change the simulation’s realism.
Conclusion
In this tutorial, we explored how to create a simple yet engaging physics simulation in Python. By understanding the core concepts of gravity, damping, and collision detection, we were able to implement a working model that showcases bouncing balls and rotating shapes. As you continue to experiment and build upon this foundation, you’ll find endless opportunities to apply physics simulations in various domains.
For your next steps, consider enhancing the simulation with additional features, exploring more complex physics scenarios, or delving into the intricacies of game development. The skills you’ve gained here will serve as a valuable asset in your programming journey. Happy coding!
About This Tutorial: This code tutorial is designed to help you learn Python programming through practical examples. Always test code in a development environment first and adapt it to your specific needs.
Want to accelerate your Python learning? Check out our premium Python resources including Flashcards, Cheat Sheets, Interivew preparation guides, Certification guides, and a range of tutorials on various technical areas.