In the age of digital content creation, video has become an essential medium for storytelling, marketing, and education. Combining images into a video can be an exciting way to share memories, create presentations, or develop marketing materials. In this tutorial, we will explore how to create a Python application that allows users to generate videos from a series of images with customizable text animations and background music. This project is ideal for developers with intermediate Python skills who want to deepen their understanding of GUI applications, multimedia processing, and the integration of external libraries.
Prerequisites and Setup
Before diving into the implementation, ensure you have the following prerequisites:
Creating the GUI Window
This snippet initializes the main GUI window using Tkinter, setting its title, size, and resizability, which is essential for creating a user-friendly interface.
📚 Recommended Python Learning Resources
Level up your Python skills with these hand-picked resources:
Academic Calculators Bundle: GPA, Scientific, Fraction & More
Academic Calculators Bundle: GPA, Scientific, Fraction & More
ACT Test (American College Testing) Prep Flashcards Bundle: Vocabulary, Math, Grammar, and Science
ACT Test (American College Testing) Prep Flashcards Bundle: Vocabulary, Math, Grammar, and Science
Leonardo.Ai API Mastery: Python Automation Guide (PDF + Code + HTML
Leonardo.Ai API Mastery: Python Automation Guide (PDF + Code + HTML
100 Python Projects eBook: Learn Coding (PDF Download)
100 Python Projects eBook: Learn Coding (PDF Download)
HSPT Vocabulary Flashcards: 1300+ Printable Study Cards + ANKI (PDF)
HSPT Vocabulary Flashcards: 1300+ Printable Study Cards + ANKI (PDF)
class VideoCreatorGUI:
    def __init__(self, root):
        self.root = root
        self.root.title("Video Creator with Text Animation")
        self.root.geometry("900x700")
self.root.resizable(True, True)- Python 3.x: This project is designed to run on Python 3. Ensure you have it installed on your system.
- Required Libraries: The project uses several third-party libraries, including Tkinter for the GUI, Pillow for image processing, and MoviePy for video creation. You can install these libraries using pip:
pip install Pillow moviepy
- Font File: Ensure you have the font file
PlaywriteAUSA-VariableFont_wght.ttfavailable in your working directory for text rendering. - Audio File: Download the audio file named
kalank_song.mp3and place it in your working directory.
With these prerequisites in place, you’re ready to explore the concepts and implementation of our video creation application.
Core Concepts Explanation
This project revolves around a few core concepts that are vital for understanding how to create a video from images:
Adding Widgets to the GUI
This snippet demonstrates how to create and place widgets in the main frame of the GUI, which is crucial for organizing the layout and enhancing user interaction.
def create_widgets(self):
    main_frame = ttk.Frame(self.root, padding="10")
    main_frame.grid(row=0, column=0, sticky=(tk.W, tk.E, tk.N, tk.S))

    title_label = ttk.Label(main_frame, text="Video Creator", font=("Arial", 16, "bold"))
title_label.grid(row=0, column=0, columnspan=3, pady=(0, 15))- GUI Development: We will utilize Tkinter, Python’s standard GUI toolkit, to create an interactive user interface. This allows users to browse for image folders, set video parameters, and initiate the video creation process seamlessly.
- Image Processing: The Pillow library will be used to manipulate images, allowing us to overlay text and create visually appealing effects.
- Video Creation: MoviePy is a powerful library for video editing and creation. It provides tools for combining images into a video sequence, adding audio tracks, and applying effects.
Step-by-Step Implementation Walkthrough
Now that we have the foundational knowledge, let’s walk through the implementation of our video creator application. We will build the application step by step, ensuring that each component is clearly explained.
Browsing for Files
This snippet shows how to implement a file dialog for selecting a directory, allowing users to choose the source folder for images, which is a common feature in file management applications.
def browse_source_folder(self):
    folder = filedialog.askdirectory(title="Select Source Folder")
    if folder:
        self.source_folder.set(folder)
1. Creating the GUI Window
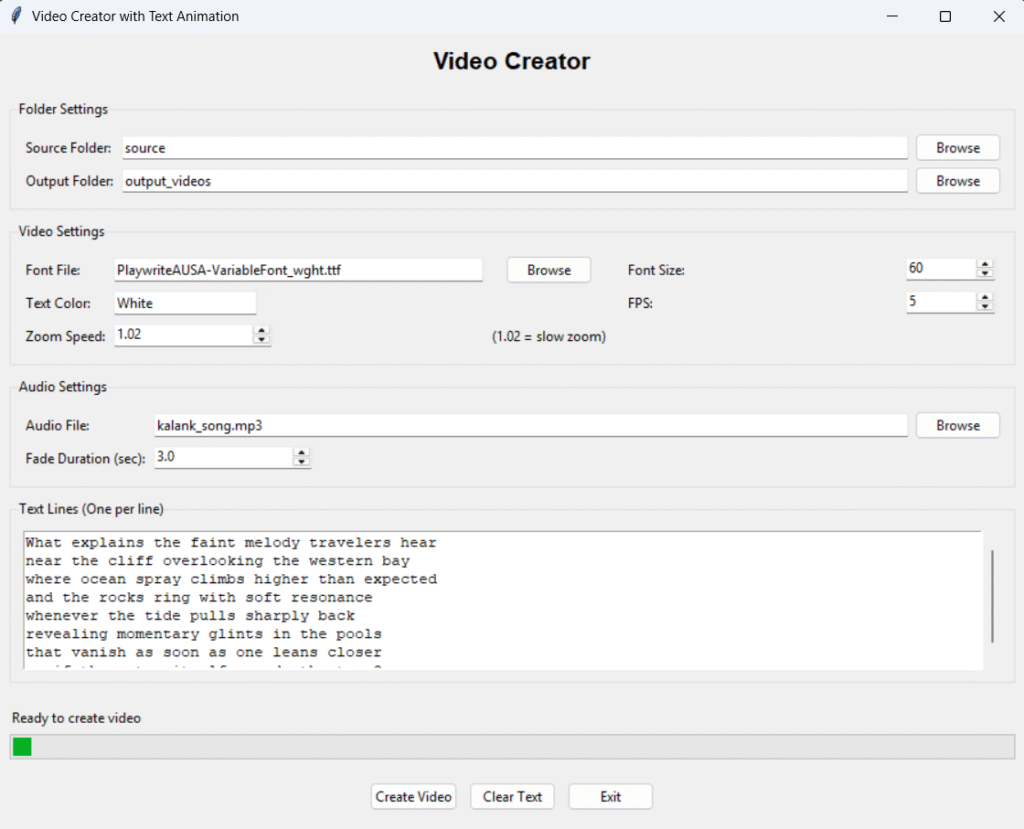
We begin by setting up the main GUI window using Tkinter. The window title, dimensions, and other properties are configured to create an inviting user interface. As shown in the implementation, we define a class that manages our GUI components, initializing variables that will store user inputs such as folder paths and video settings.
2. Adding Widgets to the GUI
Once the main window is set up, we proceed to add various widgets such as labels, buttons, text fields, and spinboxes. Each widget serves a specific purpose, like allowing users to select source folders, adjust settings like font size and video frame rate, and input text for animations. The arrangement of these widgets is crucial for usability, as an intuitive layout enhances the user experience.
3. Browsing for Files
To enable users to select image folders, we implement a file dialog. This feature allows users to browse their filesystem and select the desired directory containing images. This is demonstrated in the implementation, where we define a method that opens a directory selection dialog and updates the corresponding variable.
4. Configuring Video Settings
Next, we provide options for users to configure video settings, such as font size, frames per second (FPS), and text color. These settings are essential because they allow users to customize the final video output according to their preferences. For instance, the font size affects how prominent the text appears on screen, while FPS influences the video’s smoothness.
5. Creating the Video
After gathering user inputs, we implement the core logic for generating the video. This involves loading images from the specified folder, applying any desired text overlays, and combining them into a video clip using MoviePy. Each image is processed individually to create effects, such as zooming or fading, which enhance the final product. This step is crucial as it transforms the static images into a dynamic video experience.
Credits and Attributions
The images featured in this video were generated using Leonardo.AI, an artificial intelligence image generation platform. All audio content used in this video remains the property of its original copyright holders. This video is created for educational/entertainment purposes, and all rights to the music belong to the respective artists, composers, and production companies.
6. Exporting the Video
Once the video is created, we provide the option to save it to a specified output directory. This functionality is vital as it completes the user’s workflow, allowing them to easily access and share the final video. The implementation demonstrates how to handle file paths and ensure that the output directory exists before saving the video.
Advanced Features or Optimizations
For developers interested in enhancing their application, consider implementing the following advanced features:
Configuring Video Settings
This snippet illustrates how to use a Spinbox widget to allow users to select a font size for the video text, demonstrating how to capture user input for dynamic settings.
ttk.Label(video_frame, text="Font Size:").grid(row=0, column=3, sticky=tk.W, padx=(15, 0))
ttk.Spinbox(video_frame, from_=20, to=200, textvariable=self.font_size, width=10).grid(row=0, column=4, sticky=tk.W, padx=5)- Video Effects: Explore additional effects such as transitions between images, or more complex animations that respond to the audio track.
- Dynamic Text: Allow users to input multiple lines of text and configure their appearance, positioning, and timing within the video.
- File Format Support: Expand support for various image formats and video compression options to enhance compatibility and performance.
- Progress Indicator: Implement a progress bar or indicator to provide feedback during long processing tasks, enhancing the user experience.
Practical Applications
This video creator application can be applied in numerous scenarios, including:
Progress Bar Implementation
This snippet sets up a progress bar in the GUI, which is important for providing visual feedback to users during long-running operations like video creation.
self.progress_bar = ttk.Progressbar(progress_frame, mode='indeterminate')
self.progress_bar.grid(row=1, column=0, sticky=(tk.W, tk.E))- Personal Projects: Create memorable slideshows of family events, vacations, or celebrations.
- Marketing: Develop promotional videos that showcase products or services through engaging visual storytelling.
- Education: Produce educational content that combines images and narration, making learning more interactive.
Common Pitfalls and Solutions
While developing this application, be aware of common pitfalls:
Starting Video Processing in a Thread
This snippet demonstrates how to start a background thread for video processing, ensuring that the GUI remains responsive while the video is being created, which is a key aspect of good user experience design.
def start_processing(self):
    if not self.is_processing:
        self.is_processing = True
threading.Thread(target=self.process_video).start()- File Path Errors: Ensure that users are correctly selecting existing folders and files. Implement error handling to provide meaningful feedback if a file is not found.
- Performance Issues: Processing a large number of images can be resource-intensive. Optimize image handling by resizing images before processing or using a threading approach to improve responsiveness.
- Audio Synchronization: When adding background music, ensure that the audio duration matches the video length to avoid abrupt endings.
Conclusion and Next Steps
In this tutorial, we have explored how to create a video from images using Python, Tkinter, Pillow, and MoviePy. By following this step-by-step guide, you should now have a functional application that allows for customizable video creation. As you continue your journey in Python development, consider exploring more complex multimedia projects or integrating additional features into this application.
Next steps could involve experimenting with different video formats, exploring more advanced video editing techniques, or even deploying your application as a web service for broader accessibility. The possibilities are endless, and each project will enhance your skills as a developer.
We hope you found this tutorial engaging and informative. Happy coding!
About This Tutorial: This code tutorial is designed to help you learn Python programming through practical examples. Always test code in a development environment first and adapt it to your specific needs.
Want to accelerate your Python learning? Check out our premium Python resources including Flashcards, Cheat Sheets, Interivew preparation guides, Certification guides, and a range of tutorials on various technical areas.